Showing posts with label Techniques. Show all posts

Tuesday, October 8, 2019

Techniques Camera Controls and Blur

Camera Controls and Blur

Definition: Blur is the apparent streaking of rapidly moving objects in a still image or a sequence of images such as a movie or animation. It results when the image being recorded changes during the recording of a single frame, either due to rapid movement or long exposure.

Research

William Klein

He was born on 19th April, 1928 in America. He was a French photographer and used unusual photographic techniques. One of these was working with blur as it allowed him to react instantly to something that was happening around him. Therefore the first thing he didn't use was a tripod as a result his photos had a tendency to not be straight.
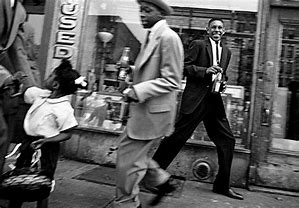

The fact that this photo isn't straight (in line with the road) you can tell that he has quickly taken the photo. The blur is shown in the man who is dead centre of the photo as well as the child in to the left. The blur is due to them walking which for a normal person who is walking rather slow would be a around 80 beats per minute. The man in the black suit has obviously noticed the camera and stopped to smile which is why he is in focus.

Camera Controls


The main camera controls:

Aperture:


Large aperture = Low F Stop = Narrow depth of field

Small aperture = High F Stop = Wide depth of field

Shutter Speed: means the timing and duration of opening and closing of the shutter curtain at the back of the camera. A fast shutter speed will freeze action will slow the speed creating a blurring effect (motion blur)

The relationship between the shutter speed and the aperture


This gives the ample ISO setting.

ISO: 100, 200, 400, 800, 1600

Contact Sheet


Camera Settings:
ISO - 200
F Stop 20
Shutter Speed 1" (a second)

Analysis

This technique went really well as the go the desired effect of the motion blur. This is due to using and understanding the camera settings i was using in order to create the photos. In the first photo I tried the easiest one to capture as i could make sure that the subject was moving fast enough for the blur to work and it worked first time. This most likely happened due to the long shutter speed as it would show any movement that was made. In all the photos the background remained still and only the subject was moving. This showed good camera control as there was no camera shake. In my opinion i like how in the photo you can still make out what the subject is doing.

Will I use this technique in my work?

I may use this technique in my work in order to help blur out the people as they walk. This will allow the main focus of my work to remain still while taking out distractions like peoples faces.

Tuesday, September 17, 2019

Techniques Slow Sync

Slow Sync

Definition: it's just a fancy term for using your flash with a slow shutter speed. It helps you keep your subject sharp while capturing motion or a dark background.

What's the difference between slow sync and normal flash photo:
You see, with a normal flash photo, the shutter is only open for a fraction of a second, so the flash is
firing for most of your exposure.
With a long exposure, your camera's shutter is open for much longer than the flash is firing - perhaps
even several seconds.
You can choose whether you want to fire the flash at the start or end of the exposure.
Firing the flash at the start of the exposure is known as "front curtain" or "1st curtain". Firing it at
the end is known as "rear curtain"

Image Bank:


Original Photos


Settings
1. Manual settings
2. Shutter speed - 2 seconds
3. ISO - 800
4. F stop - 8 ( Making it purposely darker )

Studio Equipment
1. Model light + Snoot


This will allow the light to be more pin pointed as it is only allowed through the snoot ( the black cone ). This will give move control over the light and its direction. 

2. Black background


The black background will absorb any extra light as well as so the movement as the movement will cause the light to bounce of it therefore the camera can pick it up. 

3. Hand held clicker for flash

The hand held clicker will allow control of the amount of times the flash goes off. As well as this it will allow control over when the flash also goes off. This means that you can experiment with different speeds between clicks as well as the rate at which you click for a flash.

Analysis

For these photos the technique works however it was really difficult to time the how fast the subject in the photo had to move. As a result the first shoot i did the subject moved to fast and therefore the was some effect but there was little of it. In the next two photos i directed the subject's to move slower, therefore the result was, i got a lot more of the blur. If i wanted more blur i could have also changed the shutter speed to be longer.

Will I be using this in my work?
I am most likely not going to use this technique in my work as i am not going to use a studio. This is because i am shooting outside in the streets of London and i'm not sure how i would use this technique. However if i did i may be able to use it during a night shoot as it will act like the darkness of the studio.

Techniques Multiple Exposure and Multiple Flash

Multiple Exposure and Multiple Flash

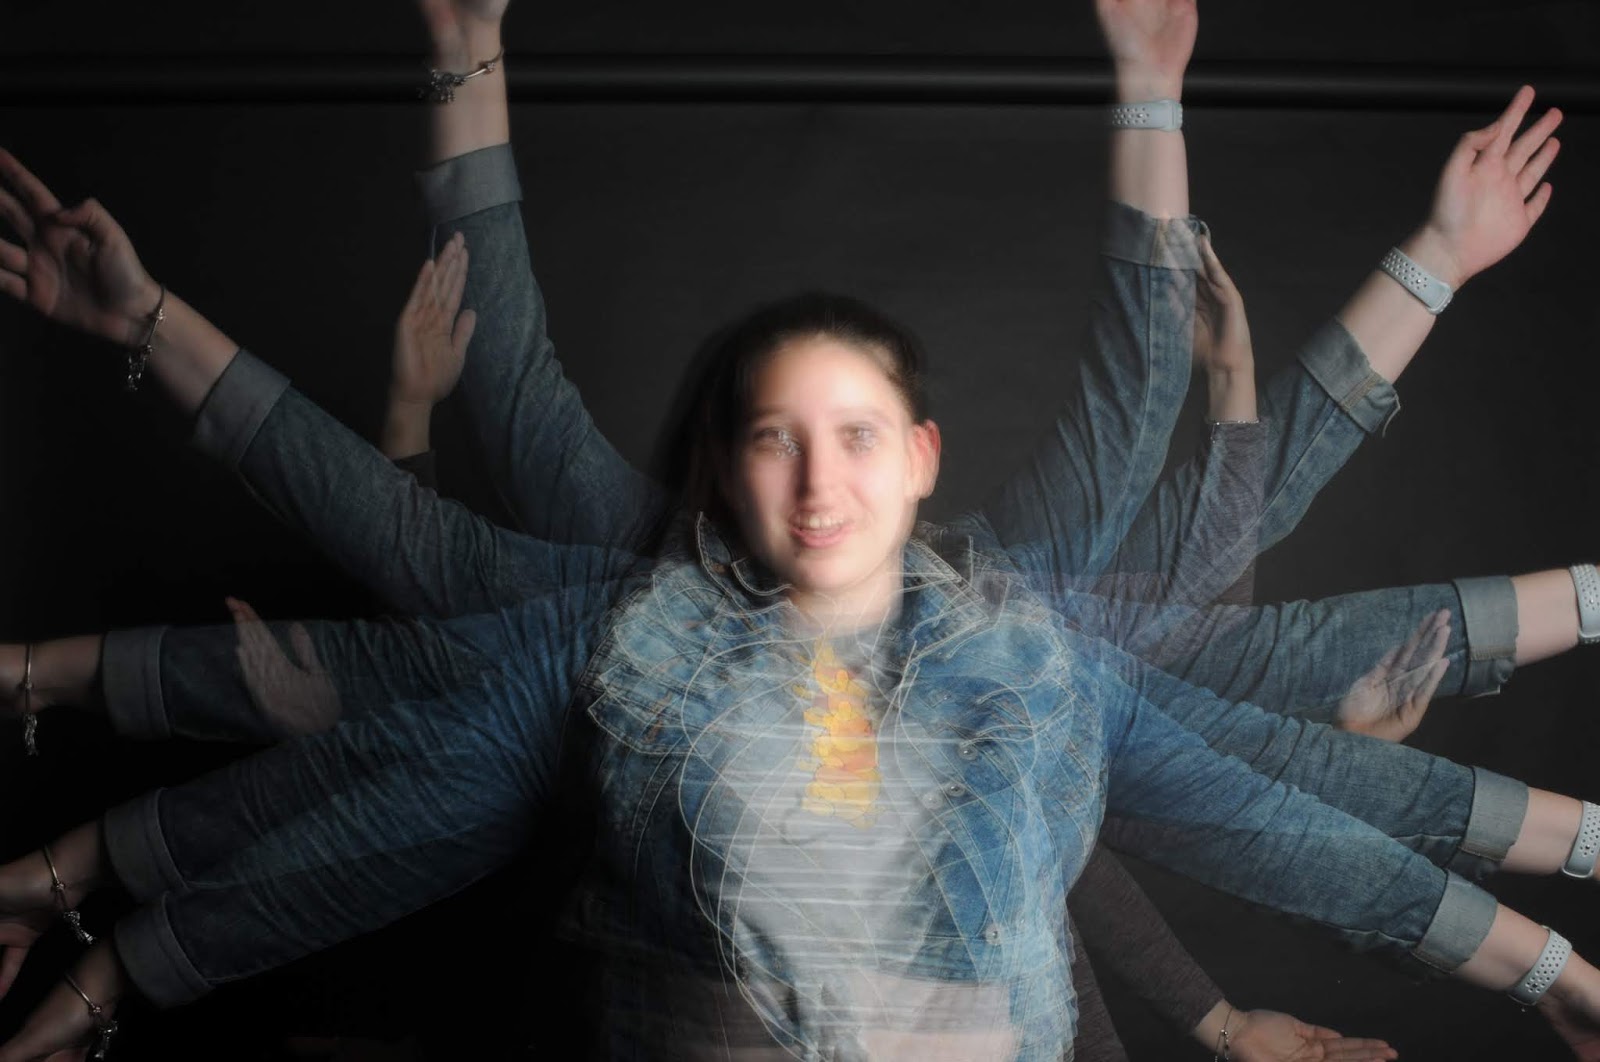
Definition: is a photography technique of combining two or numerous separate exposures into one

How to achieve this:
1. Tripod
2. Slow shutter speed, 3 - 4 seconds
3. Manual camera settings
4. Manual focus
5. Black background
6. No camera shake ( careful when pressing the button and to not move the camera after it has been                                       set)
7. Direct the shoot ( framing and knowing where the moving elements will form )
8. Soft box lighting
9. Photo-editing software ( Photoshop )

Image Bank


Research

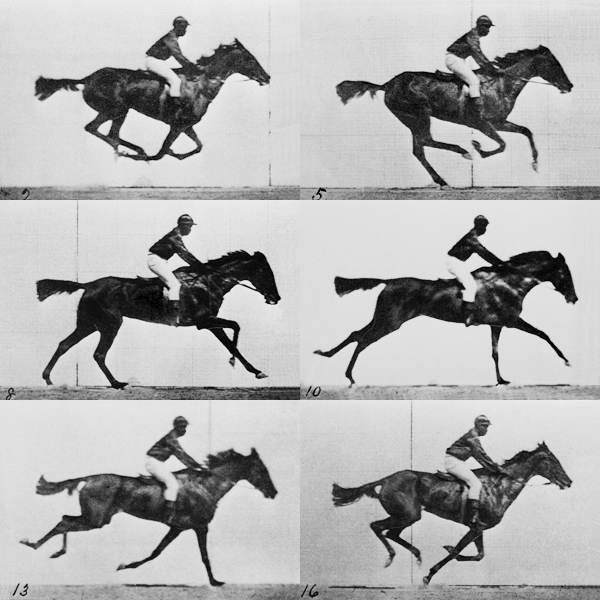
Eadwearde MuyBridge - The Horse in Motion, 1878

He was an English-American photographer that pioneered the early work in motion and motion-picture projection. He was born in 1930 in Kingston upon Thames, England and dead in 1904 in the same place.

The experiments in photographing motion started when he was asked by Leland Stanford to prove if a horse in trotting had all four legs of the ground simultaneously.


He used multiple cameras to capture motion, this is stop motion.

Stop motion is an animated film making technique in which objects are physically manipulated in small stages being individually photographed frames. This will appear to exhibit independent motion when the frames are played back as a fast sequence. Stop motion using humans is sometimes referred to as pixilation.

An early device for displaying moving images is called a zoographiscope and is how the movie projector originated from.The projector used 16" glass disks onto which Muybridge had an unidentified artist paint the sequences as silhouettes. This technique eliminated the backgrounds and enabled the creation of fanciful combinations and additional imaginary elements. Only one disk used photographic images, of a horse skeleton posed in different positions. The machine was hand-cranked.


An animated sequence showing a horse galloping, with a jockey on its back


An animated GIF of a photographic sequence shot by Eadweard Muybridge in 1887. His chronophotographic works can be regarded as movies recorded before there was a proper way to replay the material in motion.

Original Photos


Settings
1. Manual setting
2. Shutter speed - 4 seconds
3. Aperture - F 22
4. ISO - 200

Studio Equipment
1. Soft box light
2. Remote trigger ( flash )
3. Black background
4. No external light

Analyse of photos

For all the photos the technique worked really well and i got the effect i was looking for. If i wanted more movement i could increase the shutter speed and at the same rate increased the amount of times i used the flash. I had to adjust the position of the camera by moving the tripod as in the first photo i captured the edge of the black background i was using.

My favourite is the last photo as i really had an idea of what i wanted to capture. I really like how the the camera captured the all the movement in the photo and blurred all the features on the face and body.

Am I going to use this technique in my project ?

I am most likely not going to use this technique in my work as i do not have access to the correct equipment. As well as this i am doing my project outside and i am looking at buildings and streets. This technique would blur the photos i would be trying to take as a result of the long exposure.

Technique Location Portraiture

Location Portraiture

Definition: Location portraiture are taken of people in an environment that they live, work, rest or play in. The environment helps to tell that persons story: who they are, what they do or what is there passion / hobby.

Alex Soth  (http://blog.art21.org/2010/03/05/the-process-behind-the-portrait/#.Vjs1AXrcY5Q )

Though there are many ways of photographing on location we will start by reviewing the work of Alec Soth. In considering his work think about:
1. Camera controls and available light
2. Interaction with the subject(s)

Camera controls and available light

Lighting on location can often influence the way a photograph is taken. Adjusting the aperture to obtain a shallow (narrow) depth of field is often used. This has the following advantages:

1. Can be used to throw the background out of focus
2. Will allow you to shoot in dimmer lighting conditions as the shutter speeds at say f 4.0, f 5.6, f 8 will be faster compared to shooting at f 16, f 22.
3. If you struggle with also allow you to operate at higher shutter speeds in order to freeze movement.
4. You may choose to operate the camera in manual focus mode and try to get a sharp focus by focussing on the eyes or face.
5. If you struggle with harsh shadows you may choose to use a reflector to bounce light back onto a subject, can be quite effective but you need an assistant
6. Many photographers work with a tripod on location shoot, examples include Alec Soth, and Philip Lorca di Corcia.

Interaction with the subject(s)

Alec Soth is a photographer form Minnesota, USA and born in 1969. His series 'Sleeping by the Mississippi' was the series were he started to show his style of photography. It became a solo exhibition of 21 photographs at the Minnesota Marine Art Museum. This finished on September 1st 2019.

Taken from https://alecsoth.com/photography/ .
Titled: Adelyn, Ash Wednesday, New Orleans, LA, 2000

In the photo the lady who by the title is called Adelyn is standings in front of  what seems to be an iron gate. She has a mark of something on her forehead and is looking off into the distance. This implies to me that maybe it has something to do with religion. Ash Wednesday is a Christian holy day as its the start of Lent, and the mark on her forehead looks like the holy cross. 

Taken from https://alecsoth.com/photography/.
Titled : Charles, Vasa, MN, 2002

It shows a man, who from the title you can see is called Charles, who is in a flight suit holding model aircraft. This implies that maybe his job has something to do with aircraft or maybe it is a hobby of his. Having the background thrown out of focus really sharpens and brings the man alive. The way everything is placed shows that this wasn't just taken in the moment, it was planned to show what Alec wanted to portray. Its almost like the audience is bringing introduced to the man in the photo, learning about them and who they are.

The artist Alec Soth's style of portraiture is realised through his ability to make his subjects feel comfortable in front of his camera. In an article last year in the New York Times, Julian Cox, Curator of Photography at the High Museum, was quoted, saying that Soth "communes with his subjects and his environment through the ritual of the photographic act.

Select a location
1. Experiment with photographing at narrow to medium depth of field e.g. f 4.0, f 5.6, f 8, f11
2. Work with composition and try full body shots versus half body, and close-up
3. Work with a tripod to  frame your shots and discus the advantages and disadvantages of this approach
4. Evaluate the outcomes and create an image bank, work diary, contact sheet(s)
5. You may depending on your photography experiment with a reflector and on camera flash

Contract Sheet(s)

Camera Settings

1) Manual
2) ISO 200
3) F stop 3.5
4) Shutter Speed 1/250
5) Flash didn't use

Original Photo


Analysis

The photo technique sort of worked as the back ground grows more and more out of focus the further you get from the camera. This is happening because of the F stop I used, by using the low F stop it lowers the depth of field. This means that the focus point becomes the only point to be in focus where as the further you get from the point the more the image blurs.

If i wanted to make the photo more blurred i could continue decreasing the F stop. If i did that however it would allow more light to hit the film. Therefore i would need to adjust the shutter speed, this will allow control over the extra light.

In the photo i do like how the main colour is red and that i s the bit in focus. Having the leather jacket of the subject and the red of the car matching pulls in the eye of the viewer to the centre. So i really used that pop of colour to lead the viewer through the photo.

Will i use this technique in my work?

I may end up using this in my work as it will allow me to blur out any thing in the background, and foreground. This maybe a technique i really use when looking the at bridges in London.

Tuesday, June 18, 2019

Technique Macro Photography

Macro Photography

Definition - A macro photograph is one in which the size of the subject on the negative or image sensor is life size or greater, although most of the time we will end up looking at a large size image of a really small insect or flower.

Image Bank


Technique
- Most camera manufactures sell Macro lens which allow photographers to expand the image to greater than 1:1 . However these lens' are expensive, alternatively learners can use the camera in macro mode if available ( this may not be as effective as a dedicated lens )
- Use point of focus or manual focus
- Use a tripod to frame the object an background, apply compositional tules where possible
- Experiment with depth of field, you will be very close to your subject which results in a sudden drop off on focus, to overcome this you might want to maximise you depth of field therefore shoot at f 16 - f 22. In other circumstances you may like the drop off in focus in which case use lower f stop.
- Work with a low / medium ISO from 100 - 400
- Aply manual exposure and the exposure meter to ensure that the subject is adequately exposed.
- In some case you may choose to use flash light.

Task:
Use the studio and the Nikon camera with macro lens ONLY.  Photograph close up an eye, lips, nose , fill the frame up. Then take up close photos of different flowers.


The first set of photos taken with the Marco lens are all in focus which i really good. I really like how you can see all the different colours in the eye shown. However there is a reflection in the eye from the light used. This effect however i quite like as it shows up even more colours in the eye.


In the next series i wanted to also challenge my focusing skills by using a white flower which means there is next to no contrast making focusing the lens difficult. I believe i managed to keep the flower in focus as well as frame the photo how i wanted it. I really like the out come where all the petals look thin and soft.


In the next series i wanted to see how the lens would act on multiple flowers at slighting different depths of field. I really like how in the photos the ones in the foreground are super sharp and the top of them are starting to blur out. 


In the last series i wanted to see how much detail i could obtain. I like how these photos turned out and i really love the dark veins in the petals that are really sharp making them standout. 

Overall i think i'm likely to use the Macro photography technique in my project. 

Technique Focal Lengths

Focal Length Techniques

A camera lens is composed of multiple lens elements assembled and fitted together in a tube called a lens barrel.


A camera lens may be designed as prime or zoom.


PRIME - has a fixed focal length that does not change. They are also generally higher quality than zoom.

ZOOM - most cameras are supplied with a zoom lens allowing the user to switch from wide angle shots though to telephoto. Zoom lens' are highly flexible, however certain photographers will purchase specific lens for dedicated purposes.

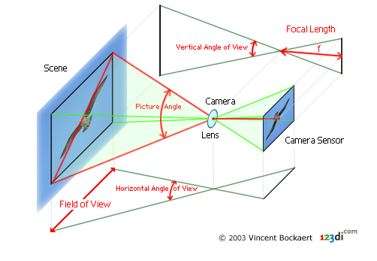
Focal length - its defined as the distance in mm from the optical centre of the lens to the focal point, which is located on the sensor.

The most important factor in any camera lens is its focal length. This determines which type of lens it is, and what subjects it will be able to photograph. Focal lengths range from just a few mm up to over a m , and can be loosely grouped as follows:


Field of view ( FOV ) - determined by the angle of view from the lens out to the scene and can be measured horizontally or vertically. Its associated with focal length, usually based on the 35mm film photography, given popularity of the format over others.
Larger sensors or films have wider FOVs and can capture more of the scene.

In 35mm photography, lenses with a focal length of 50mm are called "normal" because they work without reducing or magnifying and creates images the way we see the scene with our naked eyes (same picture angle of 46°). 

Types of lenses

Zoom lenses - A lens allowing a camera to change smoothly from a long shot to a close-up or vice versa by varying the focal length.

Wide angle lenses - ( short focal length ) capture more because they have a wider picture angle, broader field of view than the human eye. A wide-angle lens deepens space; it makes everything seem further away from the camera. It also deepens or increases depth of fields. 

Telephoto lenses - ( long focal length ) have a narrower picture angle. This is associated with larger magnification of distant objects. They magnify the images by 'pulling' them closer to you. As a result they also magnify vibrations from your trembling hand and when pressing the shutter and this can result in blur or fuzzy pictures. Also is good for blurring backgrounds with a low F Stop.


Typical focal lengths and their 35mm format designations

< 20mm -- Super Wide Angle


24mm - 35mm -- Wide Angle


50mm -- Normal Lens


80mm - 300mm -- Tele


> 300mm -- Super Tele


Focal length experiment

Need an outdoor location, using the zoom lens, ensure that there is a foreground, mid ground and background.

How to do the experiment
1. Using a tripod photograph the same scene at the different telephoto settings on your lens
2. Record these settings
3. Make sure to observe whether there is any distortion at smaller focal lengths ( 18 mm ) compared to long focal length ( 55 mm )

Example


Outdoor landscape changes
- standing in one place and using the zoom on the camera.

Camera Settings
ISO - 200
F stop 8
Shutter Speed 1 / 125


55 mm 


45 mm


35 mm


24 mm


18 mm
Facial distortion photos
- moving to frame the photo the same every time.

Camera Settings
ISO - 200
F stop 5.6
Shutter Speed 1 /125


55 mm


45 mm


35 mm


24 mm


18 mm

Analysis
For where i stood still and used the zoom lens to zoom out of the photo. The technique worked really well there is a obvious change in the landscape allowing more to be seen. The Tripod i used stopped camera shake and there is no movement other than the different change in stages.
In the series where i moved to keep the frame the same the distortion worked well. There is a clear difference in the shape of the face shown between the 55mm and the 18mm. In the background of the 55mm it is also blurred which is as expected and its not distorted. Where as in the 18mm the background is in focus but there is distortion in the face making it rounder. 

In my project i will use the knowledge of the technique in my work to stop distortion if i wanted to. As well as this i may use the telephoto lens in order to blur a background if i wanted to.